
Artwork courtesy of Scott Radowski – http://fractalfiend.deviantart.com/art/Soft-Fibonacci-Spiral-v1-267963431
Permaculture applied
Design – We’re going to examine soil remediation as it pertains to `growing healthy produce’. We will review a design strategy and approach at the orchard, working with permaculture ethics and principles, that incorporates a four-stage plan to focus on soil structure first, topsoil restoration, pioneer planting and then natural mineral accumulators on which to migrate nutrients right where they were needed.
We live in interesting times, Every day over a billion people suffer from starvation. And every day there are more and more mouths to feed. For various reasons, from changing weather patterns, to fluctuations in the price of oil, to the cost of production inputs, food prices are on the rise. Food security is becoming a very real issue for all of us. Today a good proportion of the produce that makes it to our tables is grown using systems that harm the earth and those we share the earth with. These production systems are proving to be unsustainable.
Historical records of human habitation have in many ways provided a window on the future for us; even the greatest civilizations on earth were only as strong as the food systems they relied upon. If we continue to plunder our natural resources as we do today, working in opposition to nature, our fates are sealed. It’s just logic really.
Though unfortunately, while big business maintains a firm grip on those who lead us, logic and common sense are often encumbered by personal and economic agendas. It would seem that we are between a rock and hard place. Though despite these overwhelming challenges I feel oddly positive…
There’s no doubt now that we need to change our ways if we are to survive and thrive. And with change comes opportunity. Devising local solutions to these global problems I think is important. If I can become more self-resilient then I become less of a burden on these already pressured systems, I will feel more empowered and I can help my community do the same. At a local micro economic level we can find ways to grow our own produce in a way that does no harm to the earth and those we share it with.
Rather than focus on the appearance of our produce, a modern spin on quality, size or shelf life, our attention needs to turn to growing produce that is of the highest nutritional benefit possible. If we do this then chances are the produce from our own back yards will be far superior to anything we’ve put on the dinner table before. And there’s no doubt in my mind that soil remediation that works with nature is the foundation for all of this.
So in this journal entry we’re going to examine soil remediation as it pertains to `growing healthy produce’ in our own back yards and how new leanings into this topic have contributed to my own soil remediation strategy at the orchard. To begin lets hit the topic at a high level through the following concepts…
We are what we eat
We really are what we eat. And I don’t think you would find many people who would care to disagree with this statement. Though what I’m coming to realize now is that this statement goes far deeper than I ever thought. More on this later on but for the moment take on board that perhaps one of the most empowering things we can do for our own health and for that of our own genetic legacy, our children, is to grow and consume healthy produce from our own back yards.
I’m also confident that the connection between soil health, plant health and human health runs deep. As a general concept truly healthy produce can come from truly healthy plants, or trees, and that is underpinned by truly healthy soil.
The connection between soil health, plant health and human health runs deep…
Unfortunately today truly healthy soil is an exceedingly limited resource. The earths topsoil is like a bank and the industrial monocultures employed by our primary industries have been taking and taking from that bank for decades now without putting anything back in. The topsoil bank for most of us is empty. So growing healthy produce today is more often than not reliant on remediating and building soil.
A stake in the ground
So let me a put a stake in the ground on what makes for a healthy tree. I understand some crops are purposefully stressed to gain the desired produce but at the orchard, if the soil/plant/human health connection holds true, then a healthy tree is indeed the target and endgame for all of our efforts…
As I write this today I think most plant scientists would agree that a plant needs at least seventeen‘essential’ elements i.e. those that cannot be replaced,to sustain life. Though plants also contain a wide range of ‘non essential’ elements, in the order of thirty to sixty, that over time many I’m sure will proven to be vital cogs in a healthy plant machine.
Plants need a good deal of carbon, which they get from carbon dioxide. Plenty of oxygen and hydrogen that they get from water, and lots of solar energy, from the Sun, to provide the driving force behind photosynthesis. Some of the energy they gain from photosynthesis is used to produce exudates that are leached into the soil. These exudates, primarily made up of carbohydrates, lipids and proteins, are secreted in and around the plant rhizophere, a zone extending only a few millimeters in and around the plant roots, as a form of currency in the process of trading with the soil community for the minerals and nutrients that they can’t obtain through other means.
With a successful trade our plants then synthesize those raw materials into more complex compounds and sugars, complete proteins, vitamins, enzymes etc that are all applied in the task of growing and reproducing. Their seed, our food, will be truly healthy if all of these contributors are readily available, in the rights quantities and proportions, for our trees to employ. But for that to happen our soil needs to be teaming with microbes…
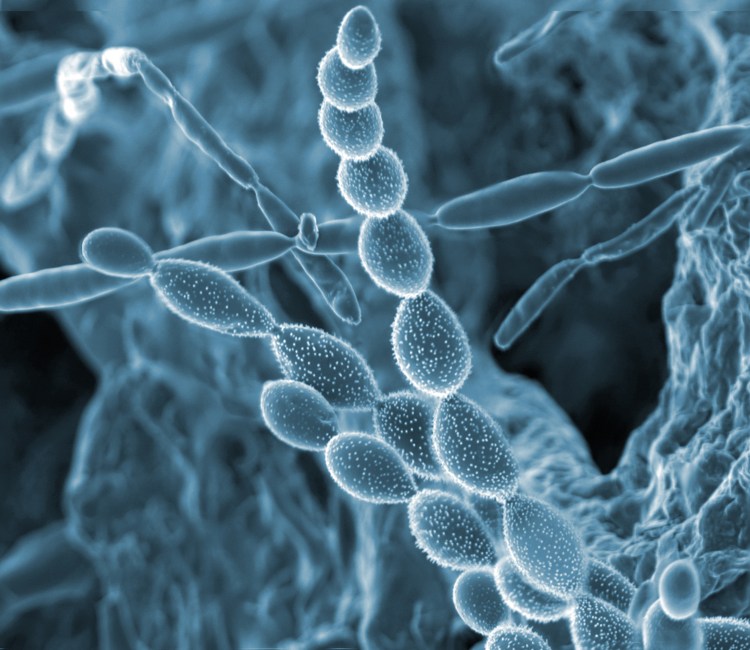
A soil teaming with microbes
In journey entry four we gained some insight into the soil, as a complex living and breathing entity, or community, made up of a myriad of life forms and relationships. This community, like any other biologic entity, needs to breathe, to drink and to feed in order to thrive.
At a structural level, in order to support a healthy soil community teaming with beneficial microbes, the soil needs to be well aerated. A good rule of thumb I am told is that half of the total soil structure should be filled with air pockets, and about a third to a half of those air pockets should eventually accommodate free draining moisture.
A healthy soil community also needs plenty of humus. Humus acts as both the home and the pantry for our soil microbes. The more biologically active humus we have in our soils the more microbes can live in it. And the better that is for our trees.
It’s a symbiotic relationship that begins with our tree root exudates and the fungi and bacteria they attract. These primary decomposers excrete enzymes that are able to break down organic matter into their most basic forms. They in turn attract and are consumed by larger soil microbes such as nematodes and protozoa. And it is the waste products from these larger soil microbes, which includes a cache of minerals and trace elements, which our trees desire…
The multidimensional role of minerals
It wasn’t until Kay Baxter, the founder and CEO of the Koanga Institute here in New Zealand, introduced me to the insights of Dr Alan Beddoe that I began to appreciate the vital contribution minerals make to the soil community and to my orchard trees.
In his publication – Nourishment Home Grown Dr Beddoe applies Dr Carey Ream’s theory of biologic ionization, or RTBI, to gardening and growing produce. From what I’ve read of the life and times of Dr Carey Reams, 1903-1985, he was an extraordinary man and a mathematical genius that counted Albert Einstein as one of his true friends and colleagues. So the story goes he once chided Albert Einstein saying, “You know how to take matter apart but you don’t know how to put it back again” to which Einstein replied that figuring out how to do that was a job for Reams.
So the story goes Dr Carey Reams once chided Albert Einstein saying, ‘You know how to take matter apart but you don’t know how to put it back again’ to which Einstein replied that figuring out how to do that was a job for Reams.
Reams theory of biologic Ionization, or RTBI, is just that. It’s all about energy to matter conversion and how matter breaks down to energy again as part of the cycle of life. He spent much of his life applying RTBI to the human health condition. In Nourishment Home Grown Dr Beddoe presents a number of principles, 29 in total, that we can apply to our production systems so they have the most potential to support healthy plants and crops that in turn can provide a harvest, packed with minerals and nutrients, vital to human health.
Combining experiences gained from over four decades of growing healthy organic produce, using heritage genetic lines, Kay Baxter builds on the work of Dr Beddoe in her own publication – A Home Gardening Guide to Growing Nutrient Dense Food. With Kay’s guidance, and these books, I’m beginning to see minerals as more than just inert amendments applied to correct an assumed or measured soil deficiency. Rather, as the building blocks for all biologic life, they exhibit chemical, physical and electromagnetic properties, or dimensions, that our soil community and plants strive to capture in various ways in order to grow and reproduce.
Throughout the journal entries leading up to this one we discussed some of the major minerals and the various roles they play in the soil and in our trees. Let me summarise:
Nitrogen
Is the core element behind the building of protein structures, vital to healthy plant growth. In living soil nitrogen-containing compounds can be present in two primary forms, that is ammonium (NH4+) and nitrate (NO3-). Some plants prefer one form to the other.
Phosphate
A compound made up of phosphorous and oxygen, plays a big role in the overall health of our soils and trees. In the soil it has the ability to lock onto to other minerals and make itself available to our trees in a way that is easily taken up. Once in our trees phosphate plays a very active role as a catalyst in photosynthesis, so more sugars are built more quickly, and in plant digestion, so more food is used to fuel growth. These processes also serve to deposit the minerals brought into the trees by phosphate right where they’re needed. Once those minerals are deposited phosphate is recycled back to the soil to begin the process anew.
Potassium
Can make our trees stems stronger and the leaves thicker. When in fruit production potassium determines how many fruit are set and how large the fruit will be.
Carbon
Plays a significant role in holding minerals in the soil, including nitrogen. The greater the carbon content than the greater the mineral and water holding capacity of our soil and the greater the electromagnetic capacity of the soil. As we described in journal entry three the form of carbon we desire in our soils is biologically active carbon that we get from humus.
Calcium
Has a major effect on the soil structure. Dr Reams used to say, “Calcium is to the soil what grease is to a bearing”. It makes the soil more granular enhancing aeration and drainage. The soil becomes mellower and is easier to work so our seedlings have a better chance of establishing their roots systems faster. And by extension this supports the mychorrhizal fungi associated with our tree roots. It is the most significant mineral taken up by plants. When in the plant calcium provides a major contribution to the plant structure and chemical reactions. The more calcium taken up by our trees the better they get at attracting nutrients out of the air, such as carbon dioxide, potassium, magnesium and nitrogen. Calcium also supports the nitrogen taken up by our seedlings in a way that makes the nitrogen more effective, so less it needed.
Trace elements
And then there are trace elements. While in most cases very little is required, hence the term, they are equally important and often vital in the process of growing healthy plants and trees.
At the orchard
Ok so we’ve covered some important concepts. Now it’s time to move from the concept level down to a practical level. When there is seemingly so much to consider often the hardest question to tackle is “where do you start?” Well I think careful observation is invariably the first step in any design and at the orchard that was no exception. With good observation leveraging a technique known as Visual Soil Assessment, or VSA, it’s possible to quickly assess the soil quality so one can determine what aspects need work or improvement.
Visual soil assessment
Using mainly visual cues, hence the name, visual soil assessment [41-46] helped me to gain insight into the physical and biological characteristics of the soil but also, to a lesser extent, the mineral properties. There have been a number of different visual soil assessment methods developed over the years. From the ones I’ve worked with, to get started, all you really need are a few tools from the garage. The most critical of which is a spade to dig out a soil profile. It begins with a sample, a slice of soil. By characterizing the soil types against various charts and physical tests its possible to determine the soil type or form, the stability and the resilience.
A number of factors such as soil structure, porosity, colour, number and colour of soil mottles, biological counts such as earthworms, panning, and the degree of clod development and of soil erosion are all assessed using visual guides and scored.
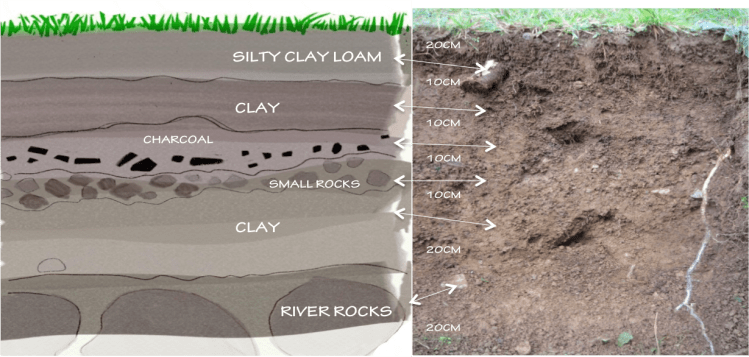
What I also found useful at the orchard was actually drawing the soil profiles and horizons. It honed my observation skills down to a level of detail that was useful.
Visual soil assessment also looks to plant indicators as cues, much like we discussed in journal entry five on understory. Characteristics such a crop emergence rates, crop height at maturity, the size and development of the root systems of your plants and the occurrence of any root diseases all provide valuable insights into your soil health over time.
At the orchard, from my first visual soil assessment, I encountered friable silt loam topsoil showing clearly discernible and stable peds, or units of soil structure, that could be best described as a mixture of crumb to blocky. Further down I encountered a number of subsoil layers that included clay and charcoal. All supported by a dense clay layer atop of an old riverbed substrate about a metre down. So we had a reasonable soil structure to work with…
Though biologically speaking the results were less promising. We encountered very little humus and not a single worm to speak of. I like to think of worms as the canary’s of the soil community. If you have plenty of worms then you can bet the soil community is in a reasonably active state. With no visible soil community to speak of but lots of mycelium I figured we were working with soils dominated by fungi, which implies soils of an acidic nature. With the site previously occupied by a monoculture of Monterey pines I’d always suspected I would be dealing with acidic soils, the extent of which I would later confirm with a lab soil test.
Various grasses including summer, crowfoot and couch grass, some hawkesbeard and dandelion dominated the understory above the topsoil. Though the combined root mass really hadn’t made much progress in working down into the topsoil at all. A sign perhaps that the soil offered little in the way of minerals and nutrients for our plant roots to pursue.
That first visual soil assessment served as an important baseline on which to compare with other subsequent ones down the track. I think the trick is to do them regularly and at fixed intervals and in doing so you get a front row seat to the visible evolution of your soil. It’s a relatively easy technique to get to grips with and your only cost is time spent and a spade. If you’re keen on learning more about visual soil assessment look to the resources at the end of this journal entry for further reading.
At the orchard we also employed a drainage testing method described by Kay Baxter in her book Design Your Own Orchard. Bringing Permaculture Design to the Ground in Aotearoa [47]. It’s best to conduct this test while the soils are still damp, in autumn and winter. Dig a hole forty centimeters deep and keep it full with water for twenty-four hours. Empty it to fifteen centimeters below the ground surface and measure how long it takes to drop by another five centimeters. If it takes longer than an hour then you may have a drainage issue. If that’s the case then you might want to conduct more tests in and around your orchard site to determine the extent of the problem and if a plan needs to be hatched to address it.
So we learnt a good deal from visually assessing the orchard soils. It’s even possible to glean some insights on the types of minerals present in the soil. Though getting an accurate baseline on what minerals are present in the soil and in what proportions is important, and the only certain way to get that is with a soil lab test…
A lab soil test
There’s quite a range of readily accessible lab soil test types and methods around today. You really have to know what you’re looking for and I would recommend you do your own research on each soil test considered before you spend money to have them done. I can only speak to the soil testing techniques I’ve encountered and had some experience with through the orchard journey.
Following the visual soil assessment I had a conventional mineral test done. At a high level I believe the procedure involved mixing my soil sample with water and a chemical extract, in this case a strong acid, to dissolve the nutrients so they can be filtered out and accurately measured. This type of soil test provides scores in absolutes i.e. this is how much calcium you have in your soil. While that’s useful it doesn’t tell me how much of that calcium is indeed biologically available to my trees. You see our tree root exudates break down the nutrients so they can be absorbed. The exudates they employ are weak carbonic acids.
So a soil test that better emulates the root exudates, by employing similarly weak acids, should give me a more accurate view of what nutrients are actually available to our plants and trees. Such a test exists, it’s called a Reams test, and we’ll talk more to that type of test, and the results from one conducted a few seasons down the track, later in this journal entry.
Nevertheless the results from our first conventional mineral test, employing stronger acids, served as an important baseline on which to move forward…
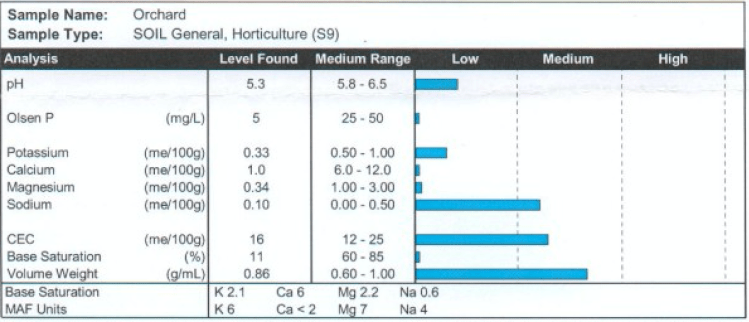
At the pH I discovered, 5.3, my soils were indeed acidic. A pH measurement is essentially a count of hydrogen ions. The less hydrogen ions around then the lower the pH is. The pH scale goes from 1, being highly acidic, through to 14, being highly alkaline. A pH of 7 is said to be neutral, neither acidic nor alkaline. I’m interested in soil pH because it can help me understand what types of microbes may be present in the soil. At lower pH levels fungi tend to outnumber bacteria and, as we’ve discussed before, this has implications on the type of nitrogen we’ll have in the soil.
Most vegetables, annuals and grasses prefer their nitrogen in the nitrate form and as such do better in alkaline inclined soils dominated by bacteria. Most trees, shrubs and perennials prefer their nitrogen in the ammonium form and as such do better in acid inclined soils dominated by fungi. Now while our fruit trees may indeed prefer acidic soils, at a pH of 5.3, I think even they would struggle. At these levels soil microbes tend to move to greener pastures and minerals get locked away. Establishing an understory, made up of primarily annuals and perennials, would be a struggle.
The test also confirmed that the orchard topsoil was severely mineral deficient. For some minerals – calcium, magnesium and phosphate, the levels encountered bordered on marginal. The remediation strategy would need to address these issues…
A design for soil remediation
With the visual assessment and initial soil test results in I felt reasonably confident that I had enough information on which to develop a design for soil remediation. A four-stage plan would focus on soil structure first, topsoil restoration, pioneer planting and then natural mineral accumulators on which to migrate nutrients right where they were needed.
A four-stage plan would focus on soil structure first, topsoil restoration, pioneer planting and then natural mineral accumulators on which to migrate nutrients right where they were needed
Tim
Terra forming
In the following I’ve combined plans with actions in an attempt to keep it brief. To develop a soil structure that could cater well to a healthy soil community I began with the implementation of what are known as swales, think of a series of terraced ditches. With the orchard on a northeast facing slope, and in an area that is known for it’s bountiful annual rainfall, swales would ensure what topsoil and subsoil amendments we applied in the future stayed where they were.
So while we had machinery in to remove the pine tree stumps we had some earthworks done to create our swales. To be honest with you what we actually ended up with more closely resembled terraces with very slightly curved depressions. I’ll certainly do better next time but for the most part I think the terraces were effective.
An irrigation channel, made by a mole plough, having a pointed shoe at the end of a long tip, to a depth of one metre and running one metre in from the orchard terrace edges was also employed. These channels aerated the soil, also providing channels along the drip line of our trees for water, and penetrated through the clay layers ensuring adequate drainage. The disturbance to the soil community by such earthworks was significant. But in this case we saw it as a one off activity that would ultimately provide a much better long term home for the soil community.
Topsoil
After approaching the structural aspects of our soil remediation my attention turned to the process of topsoil restoration. Firstly with organic compost. This was the only ever commercially prepared compost we’ve utilised at the orchard. At the time I could only afford enough to provide a couple of centimeters of compost coverage across each terrace. Mixed in with the existing topsoil the compost provided a boost to soil humus, and hence the soil community, as well as provided a good medium to incorporate our first understory seed mix in.
We followed the application of compost with a soil drench of preparation 500, the humus builder [see journal entry six]
Aerated Activated Compost Tea [see journal entry four], or AACT, was then applied as a soil tonic. Bacterial dominant brews were initially employed to facilitate the migration of soils from fungal dominance to a more balanced scenario that would better support the understory and pioneer plantings.
To support this, calcium, in the form of fine powdered lime, at a rate of three hundred grams per square metre and phosphate, at a rate of forty grams per square metre in the form of reactive phosphate rock [see journal entry one], or RPR, was added as the compost was applied. Please understand these quantities should not be considered recommended guidelines. They are simply what I decided to implement at the time. As we alluded to in journal entry one, be aware that RPR is a byproduct of uranium mining, as the elements often occur together. Sources from different regions around the world have shown higher than normal levels of radiation and cadmium. So if you’ve determined that you need phosphate and you use RPR check with your supplier about the source first and what guarantees they can provide you of its safety. Also I believe that when applied at the same time, calcium and phosphate bond together, one of the byproducts of that process is heat, and that has the potential to kill seeds in the topsoil. So if you were sowing seeds it would pay to wait a while, some say up to fourteen days, before proceeding.
Pioneer planting
Next came the understory seed mix [see journal entry five]. The understory, a range of plant species that provide low level ground cover, would fulfill a myriad of roles for us in the orchard from soil conditioning, both structural and biological, to facilitate nitrogen fixing and attracting beneficial insects.
We also planted tagasaste seedlings [see journal entry one], a very tough and ideal pioneer tree for our site. As deep penetrating multipurpose legume trees they would help to condition and bind the soil as well as facilitate a natural onsite conversion of atmospheric nitrogen in the topsoil. These fast growing trees, reaching three to four metres within a couple of seasons, would shelter the slower growing fruit trees from the elements and when coppiced would provide more raw material for humus development.
Mineral miners
By late spring, with the pioneers in place and the understory flourishing, it was time to begin planting comfrey [see journal entry two] in and around the drip line of our trees. Comfrey, with its deep taproot, would support soil conditioning and act as a mineral miner for our developing trees, particularly with potassium. And then came occasional amendments of seaweed [see journal entry three] bringing in trace elements, alginates for soil colloid forming and plant growth hormones.
Down the track a bit
Over the course of the next two seasons annual applications, in spring, of calcium and RPR occurred at the same initial rates. Whenever we were able to applications of AACT and a biodynamic spray regime involving preparation 500, 501 and cow pat pit [see journal entry 6] were also administered. By the end of season two I could see that distinct and positive changes were occurring in the soil. The worms were back. And the understory root mass has extended much deeper into the soil. The soil was darker and it had that rich soil smell, which I now know is a sign that certain beneficial aerobic bacteria, known as actinomycetes, were in abundance.
With the signs for soil health all looking very positive it was decided that the fruit tree seedlings could go in the following season.
I really should have had conducted more regular soils tests, at least annually, but it wasn’t until the end of the fourth season that I eventually got around to doing another. This time around I proceeded with a Reams test…
A reams soil test
The Reams soil test [48], developed by its namesake, Dr Carey Reams has potential to provide insight into more than just available minerals and nutrients but also other aspects such as soil compaction and tilth, weeds and pests that might persist and also crop quality and production potential. Using a chemical extract, known as the Morgan extract, a weak acid that mimics the exudates our plant and tree roots employ, we get a good picture of the biologically active nutrients that are available to our trees. I conducted my test in spring. Late summer would have been better as nutrient draw is at it’s most in the late part of the growing season. So we gain an important peak load measurement.

There’s a bunch of information we can get from a Reams soil test, most of which I’m afraid we won’t cover in this journal entry. Though to get the full value out of a Reams test I understand that you need to look past the individual scores and delve more into the ratios provided by a combination of scores. An aspect I’m still coming to grips with.
The calcium to magnesium ratio is an important one. The desired ratio is 7:1. Our result was 12:1. This combined with a pH result of 7.3 and a calcium reading of 2145 kilograms per hectare, as compared to a desired range of between 2000 and 5000, leads me to believe that my bacterial dominant aerated activated teas (AACT) combined with my calcium amendments and nitrogen fixing legumes perhaps worked a little to well. As a result I plan to tweak my AACT to be fungal dominant for a while. And perhaps hold off calcium amendments for the moment until my magnesium levels come up a tad, possibly with more seaweed teas and /or potentially other amendments. The calcium to magnesium ratio can also provide a picture of soil compaction. Soil compaction can be largely influenced by aeration and the attraction and repulsion characteristics of the particles in our soil. If you think of two magnets repelling each other, well soils with the proper ratio of minerals are said to exhibit much the same behavior. A ratio lower than 7:1 is prone to compaction.
The phosphorous to potassium ratio is also very important. At a result of 0:1, as compared to the desired ratio of 1:1, for orchards, there is some work to be done here. This result supported by a score of 46 kilograms per hectare of phosphorous, to a target of between 100 and 200 kilograms makes me wonder if my applications of RPR was a little on the light side. Also RPR is a slow release form of phosphorous. It ensures a steady trickle of phosphorous, rather than a flood as exhibited by other fertilizer forms used, so wastage and leaching is minimized. Though it can take quite some time before it breaks down enough to become available and in our case I believe that aspect has contributed to these test results. At the levels we’re seeing there just isn’t enough phosphorous to facilitate the effective transport of minerals into my trees. So I need to find an alternative short-term supply for my trees on the expectation that the RPR will kick in down the track.
Now if my orchard were just outside my doorstep I would look to incorporating ducks to the orchard. Poultry manure provides good levels of phosphorous and we also get other benefits such as pest control and indeed the potential for eggs and meat. But I’m afraid the orchard is just too remote to entertain that possibility. So I have to look for more amendments with which to introduce phosphorous. And I think the answer may lie in another naturally occurring phosphorous form known as soft rock phosphate.
Soft rock phosphate is colloidal, that is the particles are small enough that they neither float nor sink in water, and due to their size they present much more surface area and as such are more available to our soil microbes and our trees. In this form the phosphorous doesn’t tend to get locked away as other forms can do. Though I have no personal experience with this at the orchard I understand that oats and lupin green crops are adept at unlocking calcium and phosphorous that is usually unavailable to plant roots, so perhaps another angle for you if appropriate. As we described earlier phosphate, once it’s completed the task of depositing minerals into our trees, is recycled back into the soil to begin it’s task anew. By maintaining optimal soil humus and biology we can ensure we retain this precious mineral and avoid future leaching.
I think as I learn more about Reams testing I’ll gain more confidence in interpreting these results and I’ll be able to decode more from them than I can today. For the moment I shall tread carefully and seek advice from those who know this topic better than I.
Going forward I can see the two types of soil lab testing I’ve employed at the orchard being quite complimentary, the conventional mineral test, employing stronger acids, tells me what minerals are in the soil. While the latter Reams shows me, of the total, what proportions are biologically available to our trees. The combination of results will tell me if I need more raw amendments applied or if I just need to find better ways to unlock the minerals that are already there.
From healthy trees comes healthy produce
If I had a strong suit it would be soil first and then perhaps plant health. I’m no nutritionist, I’m a gardener. Though if I am indeed in the game of growing truly healthy produce, then I believe I need to understand more than I do today about the human health condition and nutrition. This looks to be one of the next steps in my own personal journey. It’s an aspect I’m only just beginning to explore.
Of course it’s a huge subject/s and I’m quite weary of discussing topics I don’t have a good deal of personal experience in. But what I’m comfortable sharing here is at least what topics and angles I intend to explore on this particular leg of my journey. Here’s the logic trail…
Every living biologic entity is gainfully employed in the life process that involves using energy to build stuff and on the flip side breaking stuff down to gain energy.
Tim
Elements and minerals, as the building blocks for all biologic life, provide the raw materials for this to happen. In this we share a common bond with the soil community and with our trees. We all need minerals!
In Kay’s booklet A Home Gardening Guide to Growing Nutrient Dense Food she points to research from Westin A Price, a dentist back in the early 1900’s, who discovered that western diets were sadly lacking in minerals, down to 25%, and fast soluble vitamins, down to 10%, as compared to more traditional and tribal diets of the time. Today Kay estimates that most of us are getting about 5% of the minerals we need to maintain human health at it’s peak cellular level, and maybe if we’re lucky 1-3% of the fat soluble vitamins A and D. But if we eat produce that’s full of the right minerals and vitamins, some call it nutrient dense produce, then we can build and maintain peak cellular health. With peak cellular health we feel better and we think better. We’re also more capable of defending ourselves from disease.
Epigenetic scientists, those who study gene expression caused by mechanisms other than changes in our underlying DNA, are beginning to demonstrate that aspects of our own health condition, that essentially come from what we eat and how we live, are passed on to our offspring, the next generation. It reinforces my belief that growing really healthy produce in our back yard on healthy highly mineralised soils is well worth the effort. It can affect our health today significantly, and because of the resulting changes to our genetic expression, the health of our children tomorrow.
So we need produce grown in highly mineralised soils supported by a healthy soil community. Kay also believes we need to leverage heritage plant lines when we can, as these plant lines are much better at taking up minerals then our modern hybrids, because modern hybrid lines have been breed and adapted themselves to mineral deficient soils. What I find interesting is that two trees, side by side, can look exactly the same and yet when tested exhibit a 1000:1 difference in mineral content. So on a day to day basis in the garden and orchard, if we can’t tell from appearances, how do we determine if our plants and trees are getting all they’re need to produce truly healthy produce? This is where a device known as a refractometer could come into play…
BRIX and the refractometer
You may encounter folks in the fields and orchard armed with a device known as a refractometer. The refractometer [49] is a device that measures the level of diffraction of light, caused by the presence of dissolved solids, through a liquid medium, or plant sap in our case. You’ll find these folks rolling leaves between their hands and pressing them through a garlic press to get a sap sample, a drop of juice, onto the refractometer.
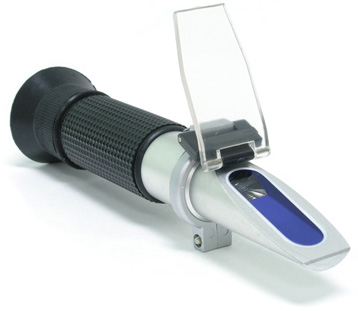
The measured light diffraction index, known as degrees Brix [50], has been used for many years to provide an indicator of sugar levels in produce. Though sugars aren’t the only dissolved solid you’ll find in plant sap. The concept of correlating brix levels to mineral levels, thus providing some insight into nutrient density, is gaining popularity.
It’s an intriguing field and one that I find quite exciting because it has the potential to provide some real time insight, literally taking seconds to test, of the effectiveness of my soil remediation as it pertains to growing healthy nutrient dense produce. Here’s how it is applied…
For our trees a Brix reading of less than twelve indicates a mineral deficiency or imbalance. Plants and trees with these low readings tend to have more simple sugars in them than complex ones. As we know simple sugars are well suited to the digestive systems of fungi and bacteria, but also insects. So a plant with a low Brix is more susceptible to pest attacks and disease.
I’m now the proud owner of my own refractometer and I’m testing my trees whenever I can and also my vegetables and herbs back at home. I believe Brix levels vary during the course of any given day. So it’s important to conduct testing at roughly the same time of day as previously tested and also from more or less the same spot tested on the plant or tree. It’s been quite satisfying to see a steady climb in Brix levels as I add amendments to the soil and to my compost. When the level goes above eight or nine I am told that our trees become more receptive to mineral absorption through the leaf processes. So a good time to employ regular highly mineralized foliar sprays, seaweed teas etc.
I’ve purchased a number of foliar sprays from a company who knows the nutrient dense subject well and have formulated specific sprays for differing growth stages of plants. If you’re unfamiliar with foliar spraying you could look to journal entry three for some notes on this technique.
So that’s the basic application of the refractometer as it applies to nutrient density. From what I gather the concept of deriving indications of mineral levels for nutrient density from refractometer readings is somewhat controversial today. It may take more time, as more field research becomes available, for us to fully understand it’s potential in the garden and orchard. I will continue to explore this topic finding what research I can and through direct application. From my own early experiences with annual crops I can see that plants with higher Brix certainly seem stronger, more resistant and resilient to pests and I can taste the difference in the produce.
If you’re interested in growing nutrient dense food I recommend you get a copy of Kay’s booklet – A Home Gardening Guide to Growing Nutrient Dense Food. Kay’s booklet also points to further reading on the subject.
A natural approach
I’m learning new things every day and I suspect my soil remediation plans will evolve. But I’m comfortable what’s been implemented at the orchard is indeed good for the soil, for those organisms sharing the orchard with us and ultimately good for our trees.
There’s no doubt that you’ll encounter a vast range of potential design elements, techniques and systems to employ in your own soil remediation strategy. Look past the labels, so to speak, and learn as much as you can about each so you can incorporate them into your own designs with confidence.
What I find quite satisfying is that by combining tried and true organic practices with new techniques and systems soil remediation has taken on a whole new level of definition for me. Ultimately that should ensure my treatments and inputs can become more targeted and less wasteful.
Downside
What I’ve presented here in this journal entry could be considered quite onerous and complicated. And I must admit as I learn more I realize how little I know. But don’t let it put you off putting a potato in the ground today! If you’re new to this subject perhaps start simple and implement maybe a couple of techniques or design elements that can play a role for you today, as you grow produce, and into the future as part of a soil remediation evolution. Take things at your own pace and enjoy the journey.
Speaking of pace be mindful that nature moves to it’s own. And in soil remediation you’ll find that some things take much longer than you planned on and in other cases much faster. It is indeed a moving target so keep your eyes on it as much as you can and you should be fine.
[14] Nourishment Home Grown by Dr A. F. Beddoe. A Whitman Publication ISBN 1-885653-20-4
[39] A home gardeners guide to Growing Nutrient Dense Food by Kay Baxter – ISBN 9780994100405
[41] Shepherd, T.G. 2009. Visual Soil Assessment. Volume 1. Field guide for pastoral grazing and cropping on flat to rolling country. 2nd Edition. Horizons Regional Council, Palmerston North, NewZealand.106p. ISBN9781877468759
[42] Shepherd, T. G.; Ross, C. W.; Basher, L. R.; Saggar, S. 2000: Visual soil assessment. Volume 2. Soil management guidelines for cropping and pastoral grazing on flat to rolling country. Landcare Research, Palmerston North. 41 p. ISBN 1–877221–93–7
[43] Shepherd, T.G. 2009. Visual Soil Assessment. Volume 3. Field guide for pastoral grazing on hill country. 2nd Edition. Horizons Regional Council, Palmerston North, New Zealand. 58 p. ISBN 978 -1-877468-76-6.
[44] Shepherd, T. G.; Janssen, H. J.; Bird, L. J. 2000: Visual soil assessment. Volume 4. Soil management guidelines for hill country land uses. Landcare Research, Palmerston North. 24 p. ISBN 1–877221–95–3.
[45] Visual Soil – Field Assessment Tool – The Methodology. A Methodology of a Visual Soil – Field Assessment Tool – to support, enhance and contribute to the LADA program. Des McGarry, Soil and Environmental Scientist, Natural Resource Sciences.
[46] Field assessment of soil structural quality – a development of the Peerlkamp test B. C. Ball, SAC Crop and Soil Systems Research Group, West Mains Road, Edinburgh EH9 3JG, UK 1, T. Batey, Plant & Soil Science Department, University of Aberdeen, Aberdeen AB24 3UU, UK & L. J. Munkholm, Department of Agroecology and Environment, A ̊rhus University, PO Box 50, DK-8830 Tjele, Denmark
[47] Design your own Orchard. Bringing Permaculture Design to the Ground in Aotearoa by Kay Baxter
[48] Carey Reams’ Testing & Evaluation Methods by Arden Anderson Ph.D,. D.O. reprinted from Acres USA, the voice of eco-agriculture, February 2007 Vol 37, No. 2
[49] For more information on Refractometers see this Wiki
[50] For more information on BRIX see this Wiki
[39] A home gardeners guide to Growing Nutrient Dense Food by Kay Baxter – ISBN 9780994100405
